
Category: Photography
Did someone say commitment?

A little dedication goes a long way, at least that’s what “they” say. So where does a lot of dedication take a person?
For those of us in any competitive field, especially when it comes to the arts (don’t ask me why, I don’t make the rules), earning a fruitful living takes more than a good eye and a little dedication. Of what and how much it takes depends on the variables, however, the father of dedication is, of course, commitment. As a twenty-something that nasty little word is to be avoided at all costs. Then one day you wake up and realize commitment is pertinent to surviving in the ever-present concrete jungle as a certifiable adult. It’s really no different than facing those squatter toilets in a foreign country. You gotta commit or you’ll end up making a mess of yourself.
A mini-trip to Houston last weekend reminded me in more ways than one that building success isn’t a half-marathon, it’s a full Iron Man. For those of you also starting a new career or new venture, hopefully these little snapshots will remind you to keep plugging along, even if it seems like a continual work in progress or feels as if the finish line is 140.6 miles away.

This is one of the finishers from Texas’ first official Ironman competition. She completed the 140.6 mile triathlon in about 13 hours. In order to train for an Ironman, the athletes workout for about 20 hours a week in the months preceding the race. Despite the sweltering Houston heat, 2,001 out of 2,160 athletes finished the race.

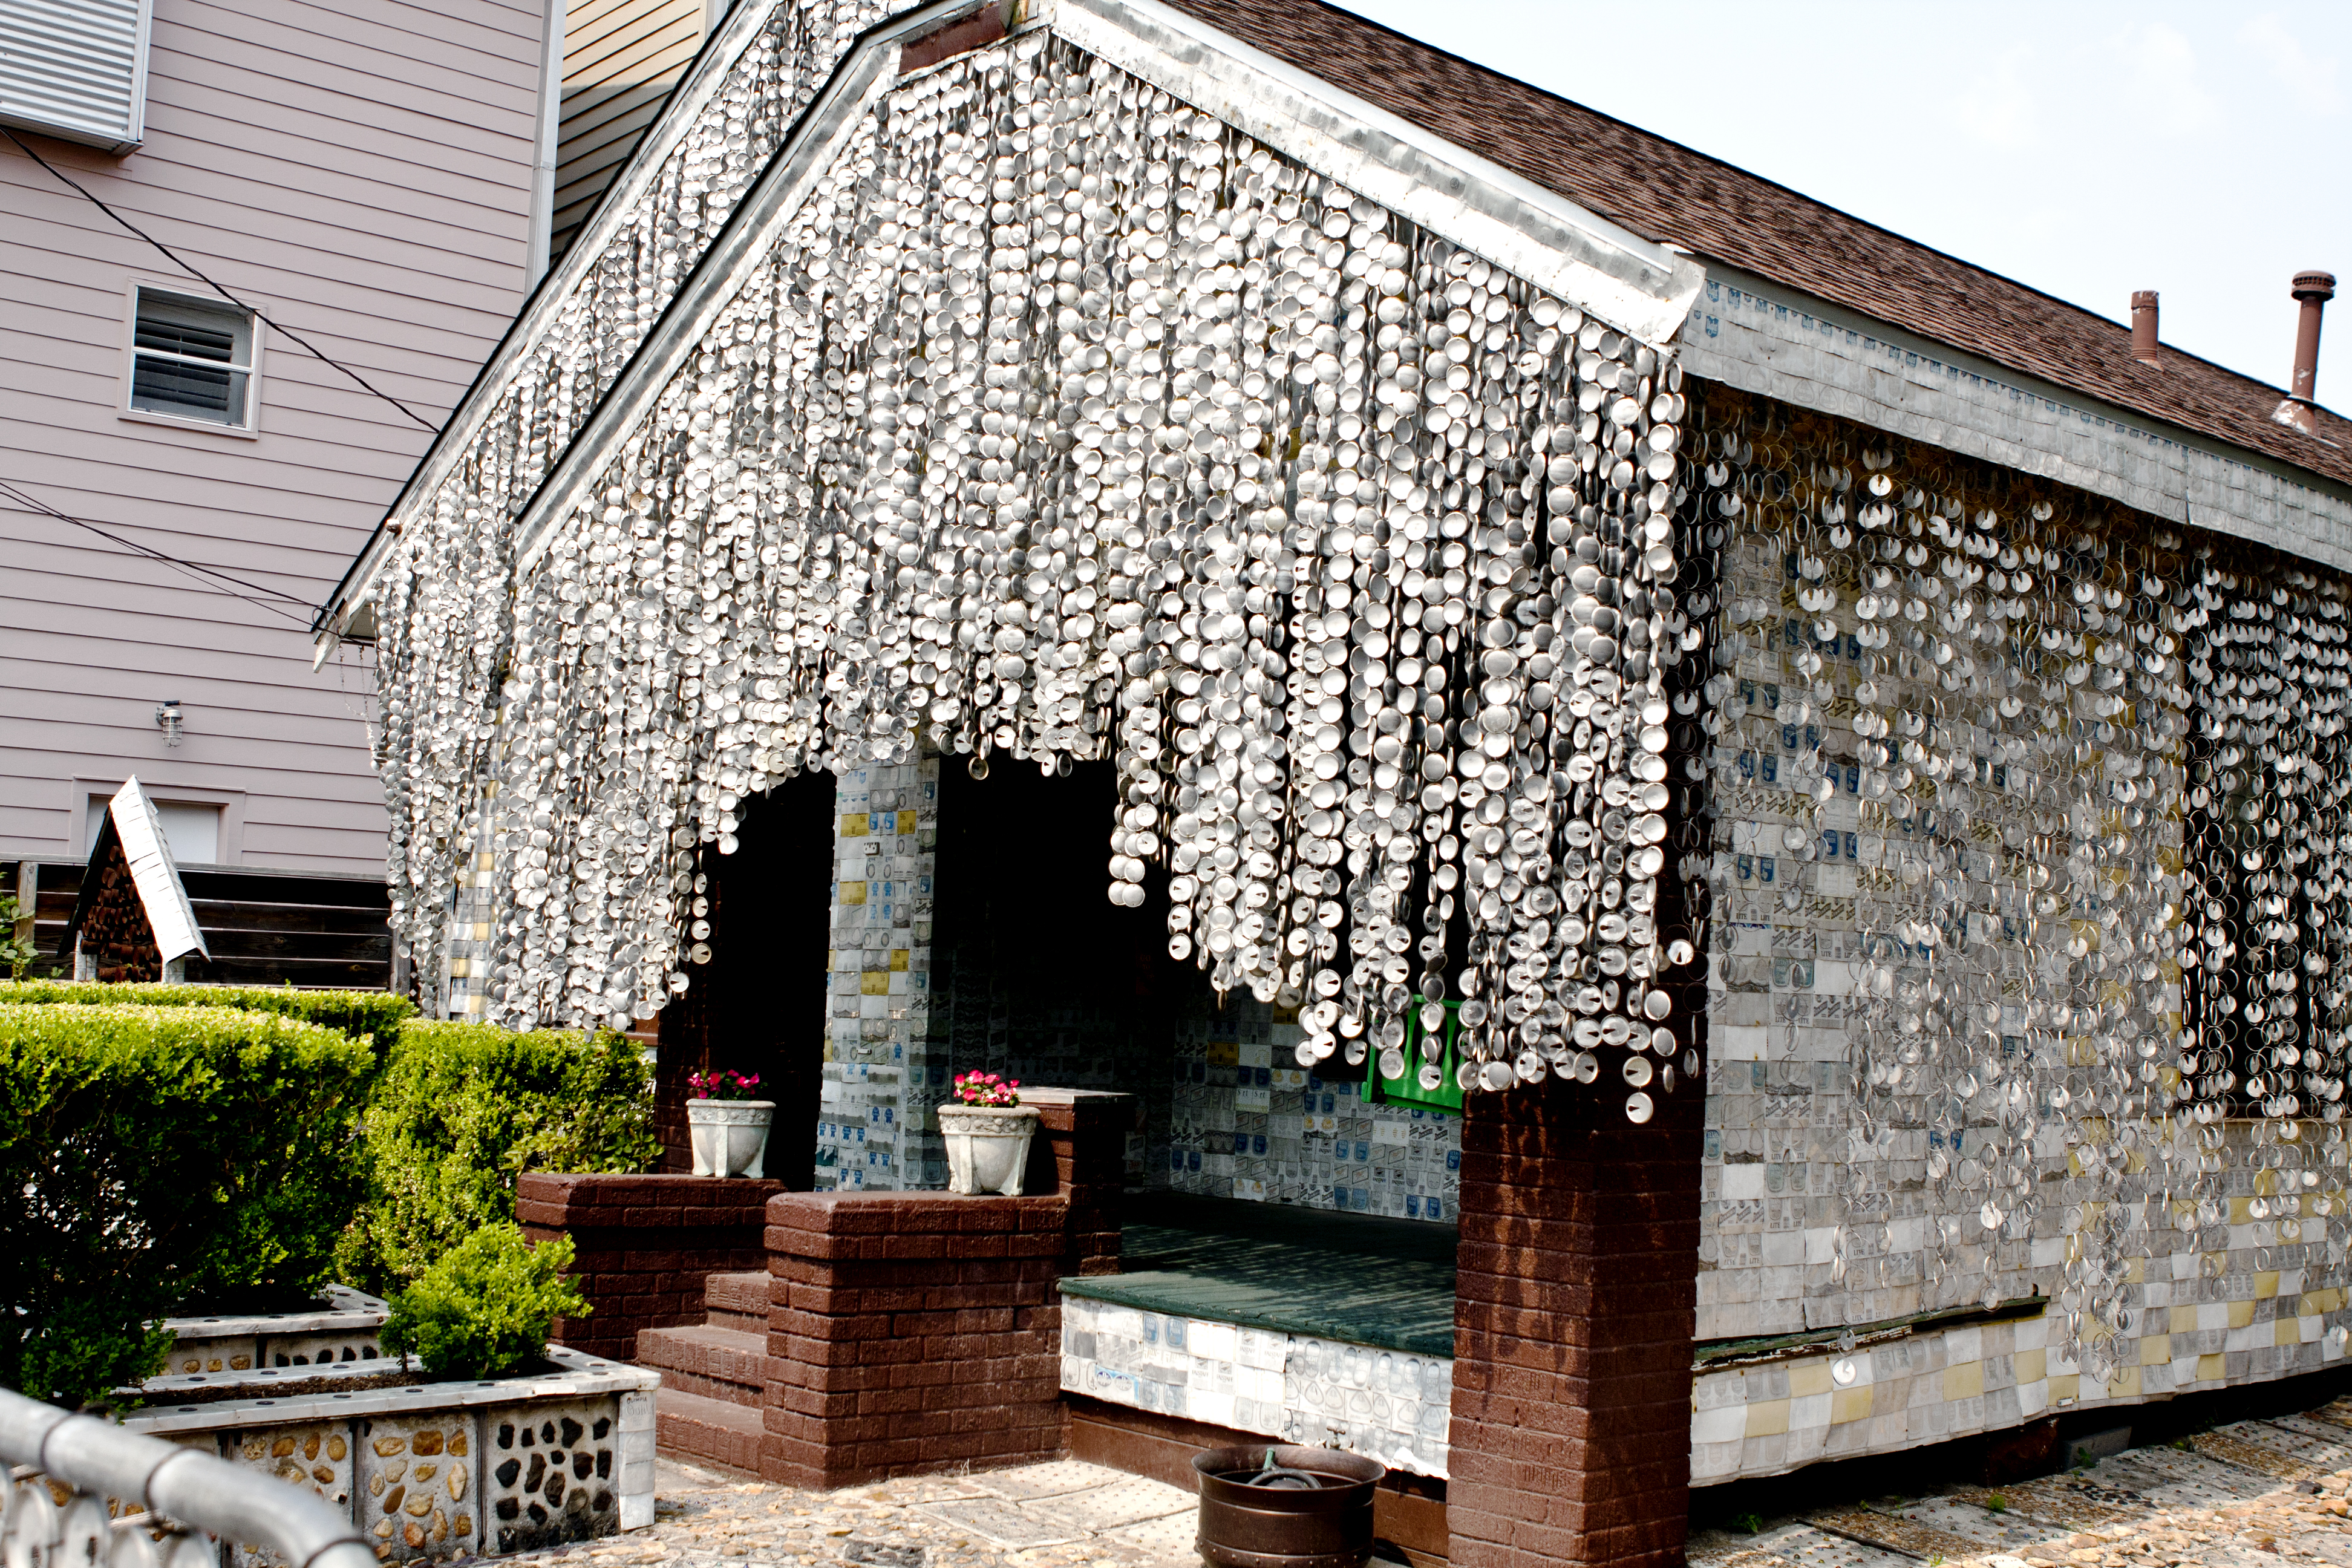
The “Beer Can House” in the Rice Military neighborhood of Houston took 18 years to complete. Owner and creator John Milkovisch drank every can that adorns his property (with a little help from his friends). While the task was more of a pastime then an artistic goal, Milkovisch just kept at it and created something unique and beautiful.
I are still cuddly
One of the many internet obsessions of today comes in the form of the cute and cuddly. From LOL cats to Cute Things Falling Asleep, people’s obsession with our furry friends has manifested itself online and wiggled its way into the mainstream realm. Kittens aren’t just for calendars anymore. Many videos and images that go viral, however, involve the very cute, very endearing, baby animals of all persuasions. This begs the question: what about our aging animal community?
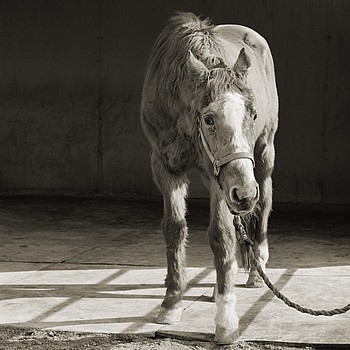
Houston-based photographer Isa Leshko has not forgotten this oft-overlooked (and might I say marginalized?) community of elderly animals. Her latest work consists of a series of portraits of just that: elderly animals. Leshko’s captivating images show that there is still beauty in the breakdown. She visited farms and sanctuaries across the country photographing geriatric animals of various species, many of them farm animals. An old dog may not learn new tricks, but she remains loyal as sure as the old rooster still crows at first light.

Handsome One, Thoroughbred Horse, Age 33 ©Isa Leshko
Leshko’s demure images remind us that all aged creatures, human or otherwise, have a story to tell and wisdom to impart. Was that a work horse or a race horse? Was that old dog once the trusty steed of a young boy’s imagination? The images also oh-so-subtly remind us of our own mortality. It’s interesting how images of creatures very much alive can prompt a person to mull over the intricacies of life and death. So, folks, let’s applaud our elderly animals, if for no other reason than to remind them that they are not alone as they rage against the dying of the light.

If you happen to be in Galveston in late summer, check out Leshko’s portraits at Galveston Arts Center, scheduled for July 16-August 21.
The vintage look and old-school technique meet fine art photography
As a little girl I would visit my grandmother’s house in St. Louis for holidays and summers, and on the wall in the living room lined up are the senior portraits of my mother and her six brother’s and sisters with their tassels hanging from the corner. It’s the first thing you see when you walk in their house and I always remember looking at each of them, noting the 60’s-70’s hair-cuts, and how pretty all my aunts look lined up there. Another distinctive aspect always drew my attention to the first four portraits of my mom and three of her sisters. They went to an all-girls Catholic school, and the portraits at their school were taken in black and white and then hand-colored. Very snazzy and popular at the time, I’m sure. I remember asking my mom about it at some point, and she explained the process that they were really black and white photos that had been painted over.
This process has become less popular over the years, obviously once color photos became all the rage and especially now that with a few mouse clicks one can create that similar vintage look in Photoshop. I tried to hand-color some black and whites myself once, after a homeless kid gave me a brand new set of photographic paints (this is a story for a different time, but for now let’s just say I am very easy talk to). At any rate, I got out a print from my black and white class and attempted to color it in. This was not easy. Not only do you have to blend the colors to look just right, but it takes such a delicate hand to keep the paint from ending up in globs all over your print. As an antsy 18 year old, I found the process too frustrating to perfect. It wouldn’t have surprised me if the process had gone extinct…
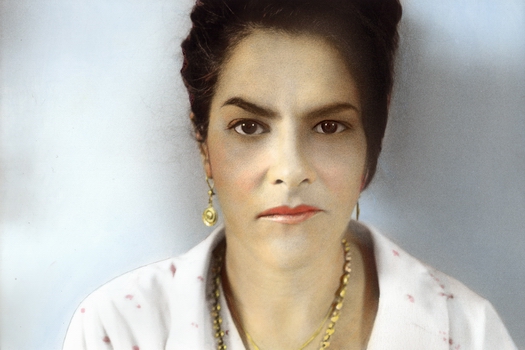
Enter Egyptian photographer Youssef Nabil. His inspiration stems from his childhood love of old Egyptian movies and movie stars and his hand painted prints reflect a nostalgia nearly everyone can relate to. He is one of the few photographers left that hand paints his photographs. He has created numerous portraits of actors, performers and artists, and has even shot some near-household names including David Lynch, Tracy Emin and Alicia Keys. While the hand painted process has come full circle and returned to a state of novelty, look past the color and you find a set of poignant photographs that convey a sense of honesty in each of his subjects. It’s no wonder his work has been displayed all over the world.

Shirin Neshat – Casablanca 2007, Hand colored gelatin silver print. ©Youssef Nabil
Nabil’s images bring more than that old Hollywood nostalgia. For me, at least, they also take me back to my grandmother’s living room.
A lesson in fine documentary skills

While I am a big fan of documentaries in general, and the photo documentary remains one of my favorite forms of expression, often you can’t even finish saying the word “documentary” before people think immediately of Ken Burns and start to roll their eyes and yawn. (I love you Ken Burns, but a lot of people think your work is boring. I blame our ever dwindling attention spans and well-intentioned bad parenting.)
So what is that “special something” that makes a photo documentary enjoyable for most audiences? The obvious answer is compelling images. A collection of compelling images, however, is just the half of it. A good photog can do a whole series of compelling images of people watching tv, but without something tying them all together you have just that. A bunch of compelling images of people watching tv. I’m yawning just thinking about it. I think it all boils down to one word: juxtaposition. That ever so subtle placement of polar opposites in one place, creating visual irony and begetting emotional response from the viewer. Life and death, youthful exuberance meets the curmudgeon, and the idiot savant are some of the popular subject matters that have yielded excellent documentaries and stories told since the birth of the medium.
The juxtaposition can be within the subject of the documentary or in the presentation. Take your compelling images of couch potatoes bathing – no, basking in tv glow and present them next to photos of people sunbathing and suddenly you’ve got a little social commentary. Sometimes, however, life provides you with a little juxtaposition and it’s our job, as documentarists, to observe the subtleties of the human condition and tell the story in an appealing (yet truthful) representation. And then sometimes life literally dumps a situation where the irony isn’t so subtle.
I happened upon a little gem by photographer Andrew McConnell that provides the perfect example of a great documentary coupling beautiful imagery with an astounding story. Enter Agbogbloshie.
First, a little background:
Have you ever wondered what happens to all those old computers? As soon as you buy a new one these days it’s almost obsolete, just the way your car depreciates the second you drive it off the lot. You take it to be “recycled” but is it really “recycled” in the way we think of recycling old paper and turning it into toilet paper? Do you really know where it goes? Chances are, some form of technology you have used and discarded has ended up in a place called Agbogbloshie. Agbogbloshie is a suburb of Accra, Ghana that has turned into a slum and wasteland of e-waste from foreign countries across Europe and from (gasp) the United States. Yes, folks, disposing of computers here is too expensive due to their being made of toxic substances, so we ship it elsewhere and sweep it under the rugs of the people of Agbogbloshie. The inhabitants of Agbogbloshie go through the materials in search of metals and hard drives that can turned around and sold. The toxic materials, however, are taking their toll on the people and the environment.
The story has come and gone over the last few years and a handful of photojournalists and news outlets have travelledto this “Sodom and Gomora” (as it is sometimes referred to) to tell this story. McAllen’s representation of this tragic issue is probably the best of the bunch.


Wanna see more? Check out the full gallery.
Hello, sun
Today I have the perfect little DIY project: it’s cheap, easy and old-school.
Sun prints!
Remember those blue pieces of paper you put in the sun and lay things on? In my first black and white class, our first project was the photogram. The process is nearly identical, the paper and developing solution is the only difference. I am actually going to show you how to do this both the old-school way by lying objects on the paper AND how to make a sunprint that actually looks, more or less, like a photograph. I’ve been using these as the CD jacket for my portrait clients, just for something different. This project is also good for kids. I do not have many tricks up my sleeve when it comes to entertaining children, but this happens to be one of them.
Here’s what you need:
•Sun print paper. I had a hard time finding this at any of the art supply stores in town and ordered online.
•A digital photo and the means to make it black and white, invert it, and print it off on regular computer paper.
•Objects to set on top of the paper. Objects of varying transparency tend to look a little better, just keep in mind if you use something solid all you’re gettin’ is the outline.
•Scotch tape
•Something flat and clear with a little weight to it. A piece of glass or plexi-glass is gonna be your best option. Don’t have any glass just lying around? Try using some from a picture frame. Just be careful of those sharp edges!
•A dish of water
First, for your sun print-photograph, select an image. Images high in contrast without tiny important details work best. Open the image in your photo-editing software and make it black and white. It’s also beneficial to increase the contrast pretty high. Next, invert your photograph so it looks like a negative. (In photoshop, on a Mac anyway, it’s command (apple) “i”). Then crop and re size the image to fit on your paper. I like to make it a little smaller than the paper so I can do some trimming and I don’t have to worry about the tape ripping off part of my final image.

©Laura Bute Photography
Next, tape the image to your glass with the image showing through on the other side, and tape a piece of sun print paper over it. If you are doing both kinds of sun prints at the same time, tape another piece of sun print paper to the glass.

I tape them both so nothing slips. ©Laura Bute Photography
For your photogram sunprint, have your items on hand. Lay the glass in the sun, and place your objects over the blank piece of sunprint paper. You could also do a combo and try placing objects over the one you are making with a print!

Lay in the sun. ©Laura Bute Photography
Let the paper lay in the sun for 10-20 minutes. You can pull back the sun print paper to check on it if you want. This is difficult if you have things laying on top of the glass, as you do not want to move them. Guesstimation is acceptable. It’s kind of trial and error.
While you are waiting, fill a dish that your paper will fit in with water.

Crumbs on the placemat under the dish do not effect the outcome. ©Laura Bute Photography
When you are done exposing the prints, take them off the glass and put them in the water. They really only need about 30 seconds.

Watch your sun print change! ©Laura Bute Photography

©Laura Bute Photography
Take them out and let them dry! Try not to rub or wipe anything across the print while it’s wet, it may smudge.

©Laura Bute Photography

The final outcome really gives ya that faded photograph look. ©Laura Bute Photography
Note that I somehow totally messed up my first photogram attempt, so I had to do a redo. This time I used dehydrated tomatoes! You can see where I tried to put feathers on there, but they blew away. Maybe feathers are good for indoors, or smashed in between the paper and the glass.


The tomatoes turned out to be a little more on the abstract side. Blue will darken as it it dries. ©Laura Bute Photography
The sun print paper is extremely thin, almost like newspaper. For my CD jackets I spray mount them onto card stock. Sounds difficult, it’s really not. Buy some spray mount and something to put it on, poster board or card stock or whatever else you have lying around. Follow the instructions on the can.
Earthquake Imagery
First I’d like to say that our hearts go out to the Japanese people and their families during this difficult time. The images piped into our living rooms of the disaster is nothing short of heartbreaking. For those ready and willing to donate, I’d like to suggest the Red Cross. While donating to the Red Cross is donating to the organization as a whole, with the Red Cross you always know your money isn’t going into unscrupulous hands. If you are interested in specifically donating to the people affected by this month’s earthquake and tsunami, contact your local chapter to see if they have set up a fund or you can donate directly to the Japanese Red Cross.
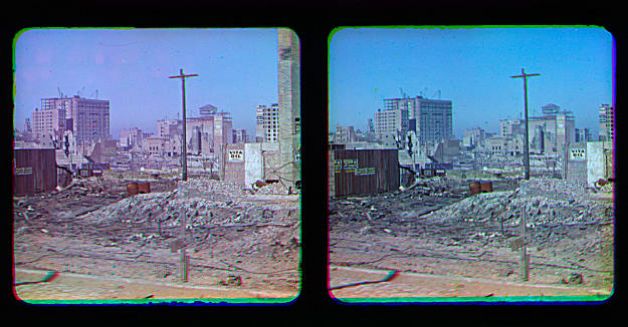
Especially those Americans that have ever lived in the West Coast, we can definitely say we’ve been there and we empathize. We all remember the San Francisco quake in ’89, and that imagery of the highway that had collapsed on itself. San Francisco was also rattled by a big earthquake in 1906. While no one living today remembers that particular incident, the Smithsonian Institute has recently uncovered photographs taken just after the 1906 quake. The images were shot by photographer and inventor Frederick Ives and here’s a curveball: they are in color. The images are possibly the first color photographs ever taken of San Francisco. The photos were also meant to be in 3-D when viewed through a special viewer Ives made. Quite the innovator, that Ives. The images are moving in multiple ways, both as a revisit to the destruction of the earthquake and offering a sense of nostalgia at seeing a city in color for the first time.

Fredrick Ives’ photograph shows the damaged Flood Building
DIY Backdrop, insert baby/pet
Making backdrops on the floor and inserting your favorite baby/pet has become all the rage lately. I believe it started with Adele Enersen, who was bored to tears on maternity leave and started wondering what her new kiddo was dreaming about. She started taking fabric and creating all the dreamy possibilities as backdrops on the floor. Some of us DIYers love this idea, but don’t have all the time in the world to make sunshine out of blankets, so some of us become one with our inner kindergartner and resort to construction paper. While maybe slightly less classy, it gets the job done.
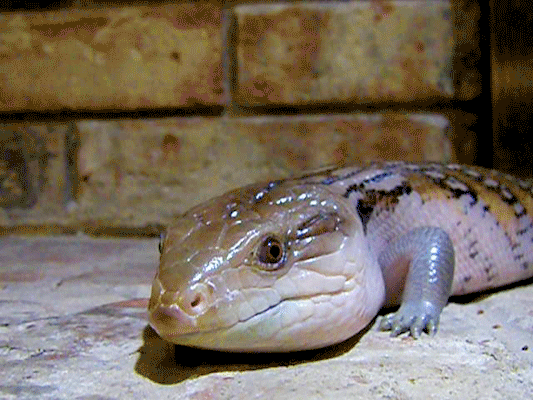
Naturally I had to make one of my own of our beloved pet: Dog, the blue tongued skink. I thought a Godzilla scene would be fitting. Enjoy!

What does your pet dream about? ©Laura Bute Photography
Pardon me if I don’t jump for joy

We all knew it was coming eventually. With the dawn of the iPhone bringing virtually everything to ones fingertips and CNN quoting personal accounts of the public from Twitter during natural disasters and the like, all the ink stained folks in news rooms worldwide knew the inevitable was bound to happen: Citizen journalism on steroids. Regular people out in the streets, reporting news from their laptops/smartphones/whathaveyou, and the media conglomerates eating it up for the sake of free content, faster news and cost cutting. The horror.
Okay, so maybe the New York Times isn’t about to lay off their whole staff of writers in exchange for citizens posting breaking news bits 140 characters at a time. However, an often overlooked branch of journalism is at risk. A new “photojournalism” iPhone app is on the horizon.

Tackable is in the process of releasing an app that serves as part image gathering, part social networking tool in which the public can share photos of what’s going on (aka “breaking news”) from any location with participating news orgs. The greater vision isn’t bad. Assuming enough people participate, the ultimate idea is that if something happens anywhere in the world you can click on a map and see photos of what’s going on in any particular place. Suddenly a paper wanting to post the story no longer has to wait for their photog to get to the scene while happenings unfold.
Tackable is currently working with 34 Bay Area papers on this project, set to launch in “early 2o11” according to their site. Editors can post assignments and anyone using the app can submit a photo. To encourage participation they are offering incentives (ie: a free donut – thanks for the heart attack btw) to anyone whose photo gets picked up. Poynter has a thorough breakdown of the process. It basically works like this: editors can post assignments that show up on a map, the public can pick them up and submit photos, and the editors can then in turn update their story in images as events unfolds. Users of the app can also submit images unsolicited by participating news outlets. Should, you know, you’re out and about and the shit hits the fan. Or, more likely, people decide that whatever they are doing is of the utmost importance and post images upon images of their dogs/babies/apartment walls.
Particularly after the unrest in the Middle East, this sounds enticing. Imagine if this app launched before the protests in Cairo. Visual updates would be posted by the second, no longer by the hour or minute. I can envision the Tackable feed running on CNN. The potential is staggering. In the middle of all this buzz, I can’t help but ask: what does this mean for the photojournalist? Will there be some kind of protocol as far as captions are concerned? I also imagine some kind of copyright-for-editorial-use hidden with a T&C situation that no one will read.
It’s no secret that newspapers are not exactly the cash cows they were before Craigslist, and the intertoobs in general, took a giant chunk out of their revenue. Budgets are tight, buyouts are ubiquitous, and jobs as a “photojournalist” are far and few between. Looking at the bottom line, free images faster are better than hiring a professional to do the job right.
Coming from someone with a degree in photojournalism, the thought of the public replacing jobs with an iPhone camera makes me cringe a little. Okay, it makes me cringe a lot. As of late, the artistic integrity of a paper has already taken a backseat to the greater issues affecting newspapers today. While every photo submission won’t make for a compelling image, 1 in 100 might. Assuming this app takes off, what does this mean for the professional photojournalist? Will the word itself even morph into a new definition of any kid with an iPhone? Are career photojournalists suddenly a dying breed? One can only hope that a heavy sprinkling of outfits will do their best to sell stories to eyeballs with a better photograph than the next guy.
While the thought of all those photogs out of work is unsettling, I have to admit that expanding the “fourth estate” to anyone with an iPhone is slightly awesome. Political figures will literally have to watch their backs and TMZ will go nuts collecting images of celebrities misbehaving in public. Lindsay Lohan, this means you.
For photojournalists out there, don’t go quitting your jobs. The thought of leaving all news images to the public is a little scary for everyone on the proverbial news corp ladder. Hopefully the whole thing will work to supplement our hardworking photogs and leave them open to working on more meaningful material instead of chasing ambulances and firetrucks. Or maybe the photogs out there should at least update their resumes/portfoliso. Or, maybe, we should set up some kind of collection bowl in which we obtain a dime every time someone asks us that inevitable question: “Have you ever considered shooting weddings?”
Remembering Leroy Grannis, dude
Some photographers work their patooties off to make a living while others find their claim to fame in a teeny tiny niche. Enter Leroy Grannis, legendary photographer and surfer. Apparently in the late 50’s, he was stressed at work, went to the doctor for symptoms associated with an ulcer, and the doctor told him to take up a hobby. A friend suggested he do more with photography. Grannis began to photograph the surfing culture in the 60’s and 70’s and worked his way into becoming a legend in both the world of surfing and photography.
Earlier this month, Grannis died of natural causes at 93 years old. For those of you pining for beaches and warmer days, check out more of his work. It’s worth a looksee.

Bernard “Midget” Farrelly surfing Makaha in 1968.
A Day in Pictures
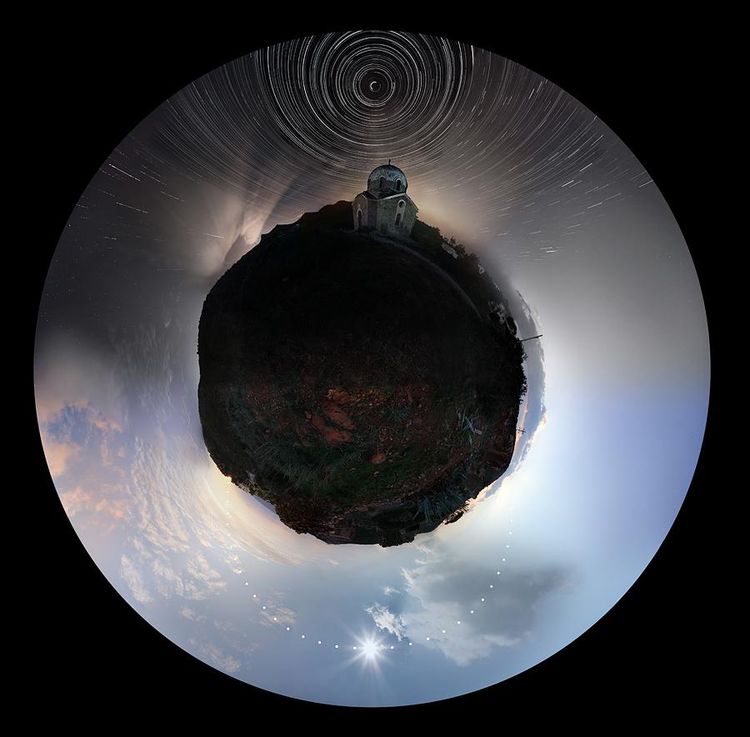
A common photo project, especially for newbies, is some variation of “a day in photographs,” meaning you keep a camera with you for a full day and shoot whatever strikes your fancy. I had to do a project like this in college, and might very well dedicate a whole 24-hours to shooting personal work again one day. Then once in a while you come across a photographer like Greek photog Chris Kotsiopoulos who takes a simple idea like “a day in pictures” and takes it to the next level and then some.
Kostiopoulos photographed the sky for 24 hours, capturing the movement of the sun, star trails, and even the Temple of Poseidon. After 30 hours of shooting and 12 hours in post production, his final image is nothing short of amazing. Read more about his process at Earth and Science. Also take a few minutes (if you could use a distraction from your work day) to check out the other images on his website, boasting beautiful sky and star pictures in addition to star trails galore.

©Chris Kotsiopoulos
About Me
After a photojournalism degree and a short stint as a lead photographer/photo editor at a news web site, I decided it was time to branch out on my own. I specialize in editorial food and travel photography but dabble in a little bit of everything.